Why Cob (or Adobe)?
Cob is a natural product that has been used for thousands of years to build houses as well as ovens. The ingredients for successful cob are all available locally either very cheaply or free. Cob is both sustainable, recyclable, and beautiful. (google images of cob houses or ovens for inspiration)
Our Project
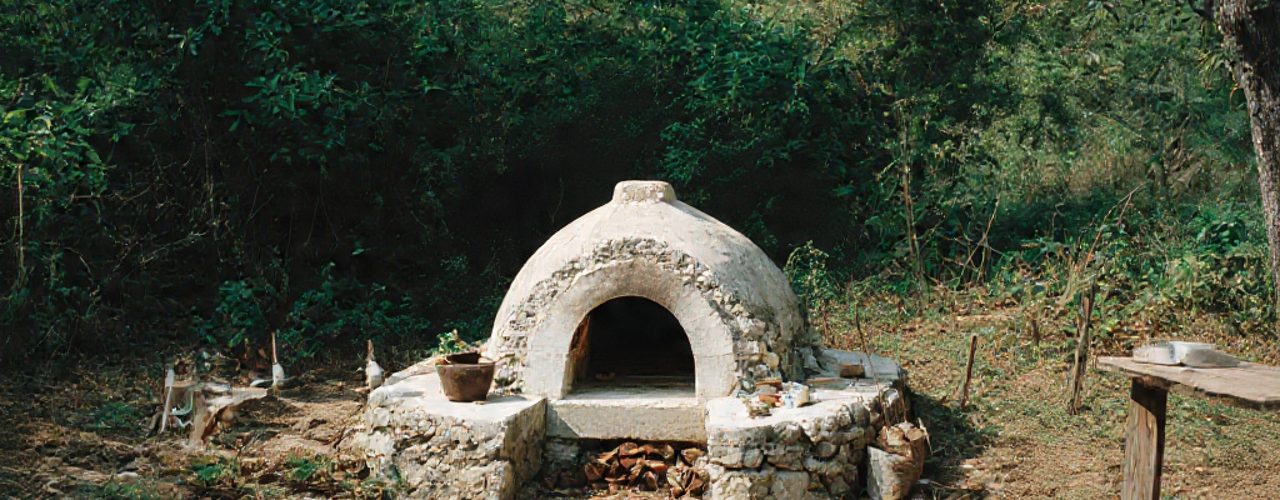
The main ingredients of our Cob oven are Clay, River sand, and Straw. A mix of Ag lime and lime putty were used for the final two plaster coats.
We wanted to get maximum use out of our oven all year round. We decided to build an outdoor area with space for a table and bench. A cover is useful your oven will last better without maintenance, and will take less time and wood to heat. Cold damp cob takes a lot more energy to bring up to temperature ty.
The Base
This has a reinforced concrete slab underneath, as it is supporting a great deal of weight (at least 3/4 tonne of clay plus sand). We wanted to use local products and we have a lot of rocks on the farm so these were great for a Rock base. The Gabion mesh was the most expensive part at $70. On top of the rocks we put a couple of layers of cob, plus a layer of wine bottles. These give greater insulation….The more insulation the more heat your oven will hold over a longer time. This allows you to cook a range of products not just Pizza ( Check out New-Zealand’s Alan Browns cookbook “The Complete Kiwi Pizza Oven”)
When building your base it is important to plan carefully the size oven you want to build, that is the internal oven space plus all the layers of insulation and plaster. Our internal oven Diameter is 80cm. Total insulation adds up to about 20cm, plus a little bit more for the chimney add on. We can comfortably fit in 2-3 medium pizzas, my roasting dish fits in, and also a family sized casserole, or at least 2 loaves of bread. Also consider height, you don’t want to have to bend over too much to put things in your oven (or to sit and stare into the fire).
The Hearth
Books, the internet and most of the pizza ovens I have seen use fire bricks or tiles for the hearth. YOU DON’T NEED TO. This can be the most expensive part, but as long as you are patient a clay/sand mix works really well. It is a little bit like laying concrete. Use a wooden frame and fill with a sloppy clay sand mix just like your first oven layer will be. Use a float or trowel to level and allow to dry before lifting frame off. Any small cracks can be easily repaired with clay water mix. Tiny cracks will not effect the use of the oven. Make sure this is very firm and dry before the next stage.
Now you are ready to start on the oven itself. Mark a circle on your hearth the diameter of your internal measurements. We used two nails on a piece of string 40cm apart (diameter 80cm). Wet sand forms the internal structure of the dome. Pile the wet sand up to the edge of your circle till it forms a dome. Your oven will work most efficiently if the dome is a perfect half circle, and is the same height as your circles radius (In our case 40cm).It is worthwhile putting a little effort in at this stage to get it right…surprising how much sand it takes. Cover the Dome with a layer of wet newspaper. This will guide you when you remove the sand later as you will know when you are about to hit the wall.
Thermal Layer
This is the main structural layer of your oven. Technically you could get away with just this and cook pretty good pizzas, though it would cool down quickly. The cob is formed into balls or bricks and built up in a single layer completely over the whole dome. This is about 8cm thick. Be careful not to press into the sand, rather gently press the layers on top of each other. Dip your fingers into water frequently and use them to help mould together. Leave to dry at least a week though it is easier to cut the door out about day 2. Removing the sand is the scariest part of the whole process, hoping that the clay sand mix won’t collapse. Start slowly removing sand and remember it’s easy to reuse the mix if needed. Once the sand is all removed you can start lighting small fires in it to help it to dry.
The Door
The most efficient height for the door is 63% of the internal Dome height. For us this was 63% of 40. Making the door height 25.2 cms. The width was less critical, though generally about half the radius (20cms for us) you do want to be able to get casserole dishes etc into the oven so take this into account. Use a sharp knife to cut the door out. If you can save this in one piece great as it is a useful template for making your door.
Chimney
I have built a small cob oven without a chimney, and many traditional ovens have no chimney. BUT you will get smoke in your eyes and it can take a little more work getting a fire started without the extra air that a chimney can create. We didn’t want the chimney to interfere with the efficiency of the oven dome, hence it was added as an extra as we built the insulation layers up (Shaped rather like an igloo).
Cob Insulation
This has straw added which improves the strength and insulation properties of the cob. This must be dry straw not hay. We used two layers of cob. It is not critical how long you take over building these layers as air trapped between layers just adds to the insulation. It is easier to complete one full layer in a day though while the product is moist. We made a rough frame of cardboard to support the chimney, and cut a hole slightly smaller than the chimney pipe so that it had a small ledge to rest on. Shapes can be moulded with the cob at this stage….let your imagination run wild. Once you have completed your layers use it. Regular small fires will help it dry fully. As your oven dries it will get easier and quicker to fire up. ENJOY.
Making a door: We have burnt out two doors so far, the latest one is made of two pieces of corrugated iron sandwiched together with a wooden handle…it will get hot….Our oven averages temperatures in the mid 500’s after about two hours of fire, and about 1/2 a wheelbarrow of wood.
Making the cob: Dancing…this is the fun part if you have friends to help, can be tedious on your own, though could be a great fitness activity. The clay is best soaked and mixed with water in buckets to the consistency of sloppy porridge, added to sand on a tarpaulin and mixed with your feet. Our mix ended up being about one part clay to two parts sand…after awhile you do get the feel of it. Pull the tarp towards you regularly to form mix into a sausage, stomp with feet again and repeat till smooth, homogeneous, and can be rolled into a ball that stays together when dropped. Straw is added during stomping in small amounts at a time, and more water as needed. Form into balls then use. If you fold the tarp over them they will stay moist for awhile. having water available for wetting hands is helpful.Lime plaster: This is a breathable finish that protects your oven as well as adding beauty. Our lime putty is made of hydrated lime from Websters Hydrated Lime Company (Havelock North) soaked in water for a long time (a few weeks is long enough) Sand is mixed with it . Then we used AG lime from Hatuma instead of river sand, as I wanted a warmer colour rather than grey. This was sieved and added to lime putty at a rate of 2:1. Mix till smooth and sloppy. I used a rubber spatula to put onto the oven. The oven must be really dry when adding the lime plaster….we had used ours a few times. Two thin layers of plaster were added. Curing slowly is best so cover your oven with plastic in hot weather.
References:
“Build your Own Earth Oven” by Kiko Denzer.
“The Complete Kiwi Pizza Oven” by Alan Brown


